We'd like to inspire and below are 5 different ways of laying out the basic components for roof panels, that include Coverfeed®.
You can divide the designs in two categories: Coverfeed® above the eave line or below the eave line.
single puller with catenary web
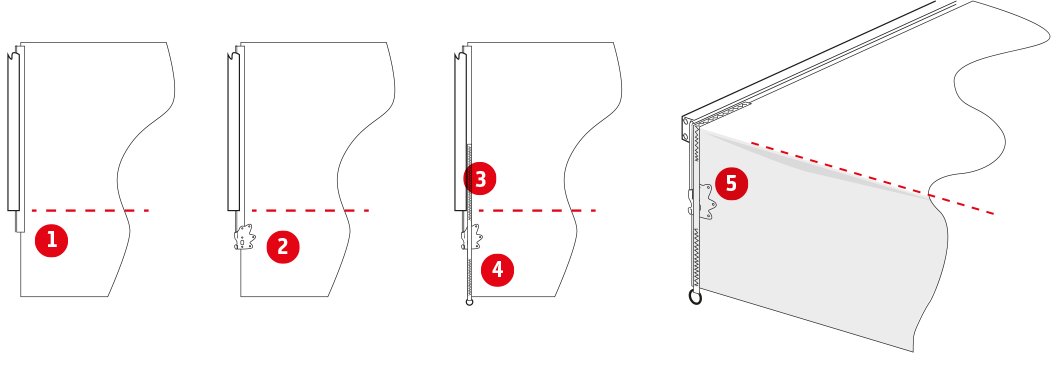
2. Install the Coverfeed®.
3. Lay out the web and stitch from above the eave line (dashed line) and some inches below.
4. leave a free space for the Coverfeed® to both wiggle and even be retro-fitted at site without any obstacles and stitch the last piece of the web down to the loop or ring.
5. Once you have established this design, the keder end is protected, loads distributed gently and your panel will have a long life.
Designers comment:
The concept of having the Coverfeed® going below the eave line ensures that the keder will take all stresses and loads sideways and it is a very simple production routine to add the catenary web and at the same. The layout is very simple to adapt for any clearspan on the market either for new productions or any repair job. The web going all the way across the eave line down to the bottom solidifies the reinforcement of the panel and distributes loads in alle areas from pulling at installment and the extra racheting for final stretching. The only 'downside' of this layout is that the Coverfeed® has to be fed backwards into the track when taken down; It may need attention in some cases for the edge to slide back in track.
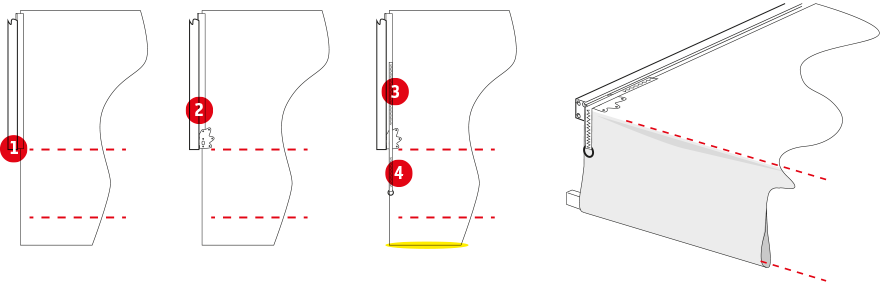
single puller with catenary web reinforced diagonally

2. Install the Coverfeed®.
3. Lay out the web and stitch from above the eave line (dashed line) and some inches below. The length of the web shall continue past the panels length for later being connected and stitched diagonally .
4. leave a free space for the Coverfeed® to both wiggle and even be retro-fitted at site without any obstacles and stitch the last piece of the web down to start of the loop or ring.
5.Put the web through the ring, bend back in the desired angle and stitch.
Designers comment:
This layout is similar to the layout above. The extra sideway directed web ensures extra stability and reinforcement when racheting at the final stages of the installment.
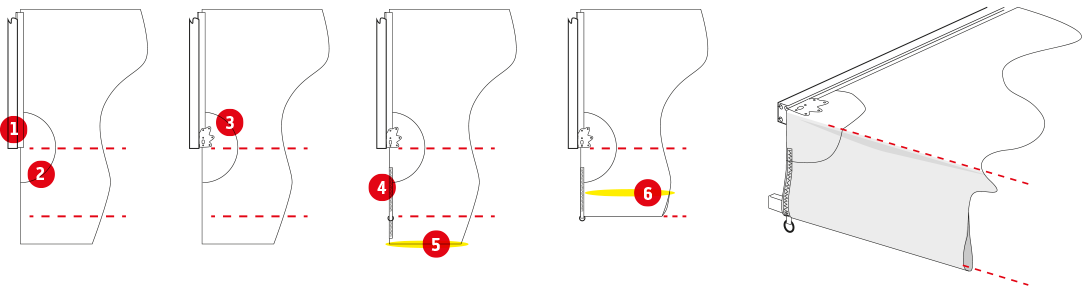
single puller with catenary web puller
2. Install the Coverfeed®.
3. Lay out the web and stitch from above the eave line (dashed line) and some inches below.
4. leave a free space for the Coverfeed® to both wiggle and even be retro-fitted at site without any obstacles and stitch the last piece of the web down to the loop or ring. Note: When laying out the bottom part of the web, make sure to ease so that when the panel bends downwards at the eave line, it will not tighten and wrinkle the panel.
Designers comment:
This is a production friendly version where the pocket is independent of the catenary web, puller and Coverfeed®. The webbing and the Coverfeed® will take the heat from the stretch and loads at the eave line.
PULLER AT THE END OF THE POCKET AND NO WEB ACROSS THE EAVE LINE
2. Add an extra patch of reinforcement aross the eaveline to protect the panel from the extra loads on the textile.
3. Install the Coverfeed®.
3. Lay out the web and stitch from above the eave line (dashed line) and some inches below. The length of the web shall continue past the panels length for later being connected and stitched diagonally .
4. Place the web and stitch on both sides of the fold that create the pocket. Make sure to add that extra space for the web to be folded and also make room for the puller ring or just a loop for the rope.
5. Leave room enough from the web end to the edge for seaming/ hot sealing.
6. Seal edge and create the pocket containing the bar.
Designers comment:
The Coverfeed® will never exit the track once fed into it and the puller is connected to the pocket alone. It is a very simple production with few routines involved but also the concept with the least expected lifetime of all 5 layouts demonstrated here.
The ultimate reinforced and keder protected layout
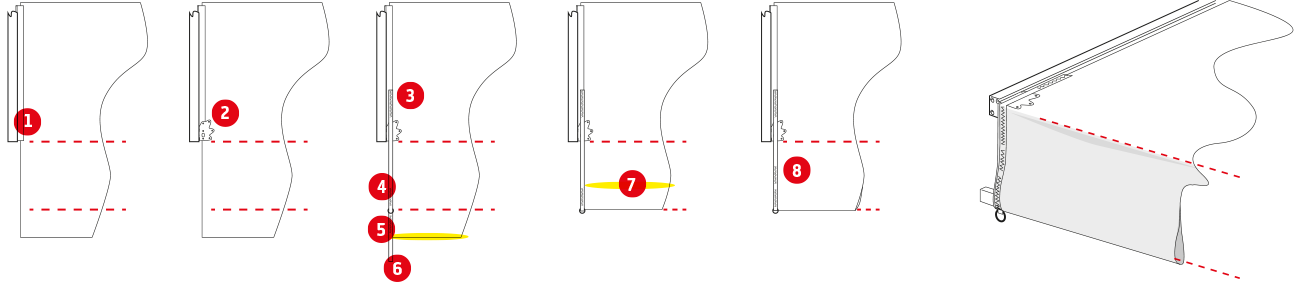
2. Install the Coverfeed®.
3. Lay out the web and stitch from above the eave line (dashed line) and some inches before the Coverfeed®.
4. Stitch the web to the panel from inched below the Coverfeed and stop a couple of inches before the fold of the pocket.
5. leave web unstitched after the ring or loop positioned at the fold.
6. make sure to have extra web exceeding the edge of the panel.
7. seam the edge of the pocket.
8. Stitch the loose web end onto the panel on the opposite side and above the seamed edge of the pocket.
Designers comment:
This is simply the best layout ensuring reinforcement of the panel all the way from before the Coverfeed® and above the eave line to below the pocket, around and up in the back all including the puller. It is also the most thorough routine and the best life insurance of a roof panel the industry can offer.
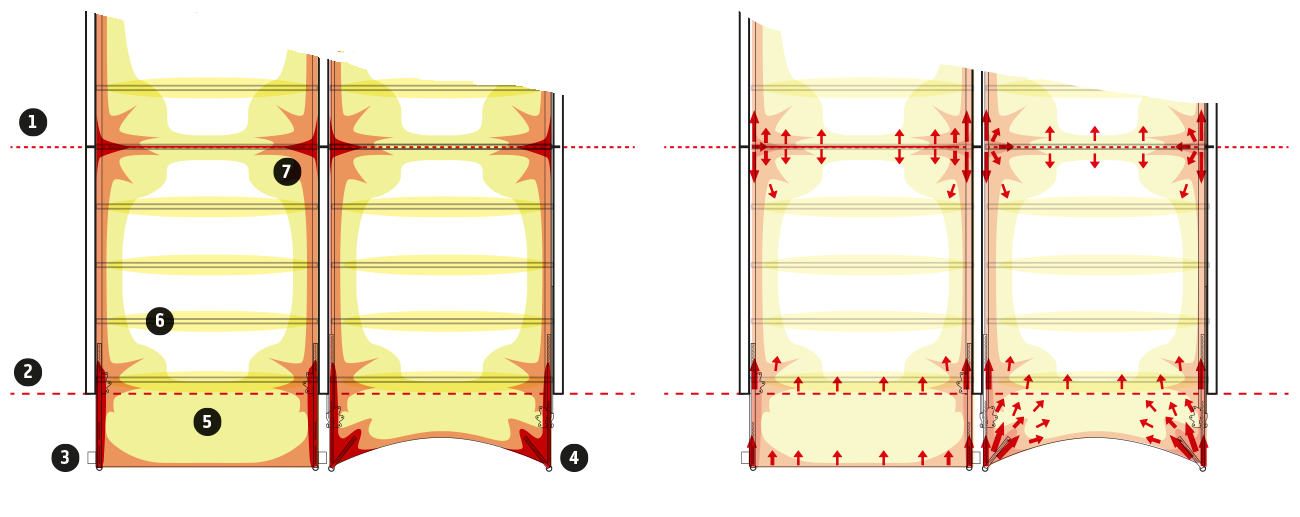
There are 3 main factors going into understanding the forces involved when designing panels and sails: The properties of the material, the directions and loads of the forces at various points of the installed panel/ surface and the way to fasten the fittings and fasteners from keder to grommets and web, including a Coverfeed®
A typical textile for clearspan tents are nylon reinforced vinyl / PVC with a grid of nylon yarns (vertical/ horizontal oriented) to control stress and loads of the waterproof membrane.
The panel will be stressed and loaded by forces from wind, water and the stretching af installing properly in multiple directions.
The fastening of the panel to the structure will create hotspots of loads, very concentrated in certain areas depending on the method of attachments and need extra reinforcements where the textile itself is insufficient
The ideal type of stitching depends on the spot, loads and directions in play
2. Eave line, typically where the cross beam ends.
3. Side bar i pocket to pull down whole side and stretch to avoid wrinkles and solidify installment.
4. Web based puller ring for attacmnet to structure.
5. Orange - Area of medium loads
6. Yellow - Area of light tension.
7. Red - Area of high load areas.
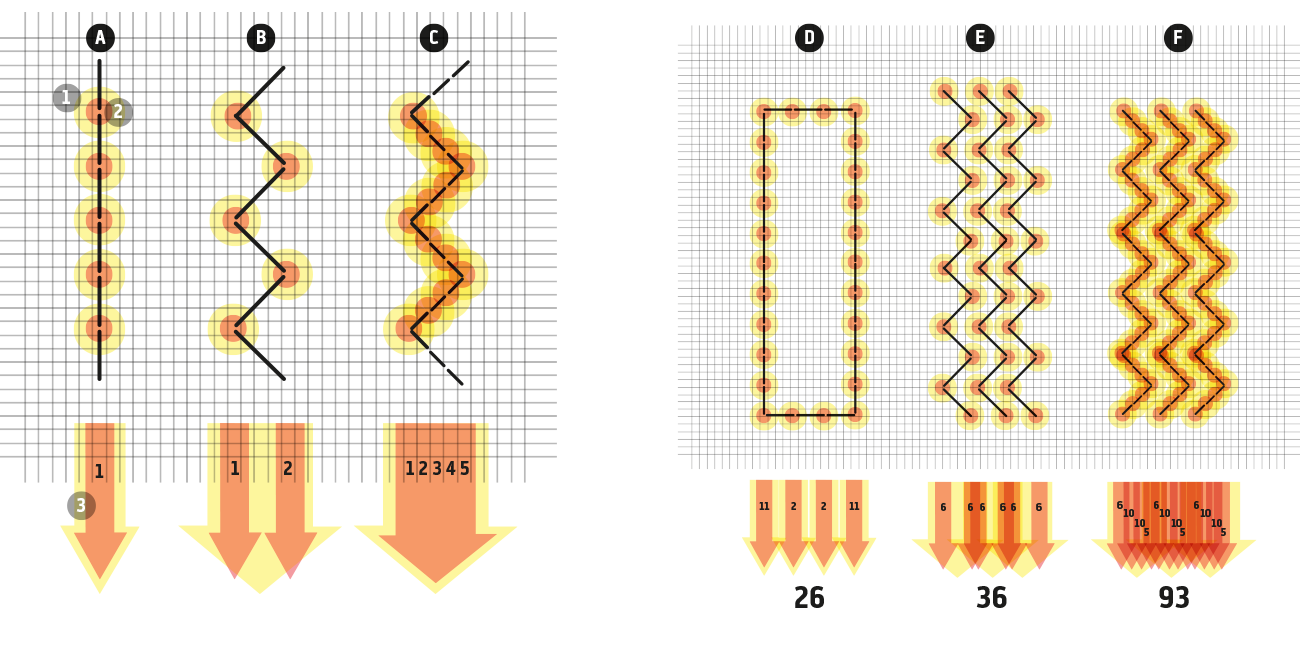
B. Zig Zag stitch - Typically used by sailmakers on woven cloth.
C. Triple stitch - Most common type for light materials like spinnaker sailcloth and parachutes.
1. Yellow - Outer perimeter load distribution and grip effect
2. Red - Maximun load tension and attachment point to panels yarn grid
3. The arrow indicates the pull direction (column) and attachment efficiency involvolving number of columns.
D. A typical stitch type (A) attaching web (pullers/ rings/ Loops) to the panel and the most commmon in the tent industry. The total number of attachment points is 26 within the demonstrated yarn grid. The load distribution is very uneven and concentrated in basically 2 colums in the pull direction.
E. A typical sailmakers type of stitching (B) for attaching web used in high load areas. 3 rows of stitching will distribute loads in 6 columns and much more evenly than type A stitching. The total number of attachment points is 36 within the demonstrated yarn grid.
F. The triple stictch is typically used on fine materials (Spinnakers and parachutes) where the textile do no not have strength or a solid yarn grid and therefore needs a lot of attachment points to distribute the same loads as shown in examples D and E.
Metal rings has some disadvantages like smothering on the vinyl, dangling and even hitting other objects when being transported and also adds an extra routine for the manufacturer. But if pullers are attached to the rings by metal hooks or schackles they will outlast the web loops
Web loops also has disadvantages; They are usually load-direction oriented and only work properly in one direction, typically for pullers. It is mainly due to the stitching that if stressed in multiple directions will create a ripping effect and compromise the whole attachment in the long run
Tech talk >
Facebook Groups >